The Art of Darkness

Leather Corset “Fake-torial”

August 18th, 2011 by Cobwebs

Bellatrix CostumeCindy of Cation Designs created a lovely Bellatrix Lestrange costume and detailed her progress on her blog. One of the pieces was a “corset” made from thrifted leather pants, and she’s put together a description of their transformation.

It’s not precisely a tutorial, but it’s a great overview of how to harvest usable fabric from unwanted clothing and turn it into something wonderful. (She mentions several times that she realizes it’s not a “real” corset, but who cares? It looks great, and anyway the Corset Police were disbanded years ago.)

Be sure to dig around the rest of her site as well; she’s got several other costume projects in the works, plus she’s done some nice knockoffs of designer clothes using thrifted items.

Posted in Doom It Yourself | 1 Comment »

Nefertem Shawl

July 26th, 2011 by Cobwebs

Oooh…pretty.

Nefertem Shawl

The Nefertem shawl is a lace-knitting pattern by Kristen Kapur of Through the Loops Designs. It’s currently only available as part of a pattern/yarn kit through The Loopy Ewe, but the pattern will be available by itself in October.

There’s a little more information about it in the Ravelry library, plus a photoset on Flickr where it’s also shown being worn as a scarf. Red Pepper Quilts has a review of the pattern and some more photos.

I love the delicate, spiderwebby look of this piece, and have to say that I think I like it better in the dark purply-grey yarn of the kit than I would in plain black. This would be a perfect light wrap for an evening out or, as Hinkenhook suggests, a bridesmaid’s gift to be worn in a Hallowedding.

Posted in Doom It Yourself, Terror in the Aisle | 3 Comments »

Zombie “Truffles”

July 11th, 2011 by Cobwebs

TrufflesI’d never paid much attention to the novelty brain-shaped molds for chocolate and ice cubes, but over on Instructables kristylynn84 is using them to great effect. Her zombie truffles look splendid, and I’m particularly taken with the presentation.

I do have a couple of minor quibbles about her instructions: She suggests dropping a blob of melted chocolate (actually coverture, in her example) into the mold, adding filling, and then covering with another blob of chocolate. This tends to cause small bubbles which will mar the surface of the finished candy, plus quite a lot of hardened chocolate will have to be trimmed off the bottom. Better results could be had by filling and then inverting the molds to evenly coat the interior (you could also use a clean paintbrush to paint the chocolate onto the molds), filling them as desired, covering with additional chocolate, and then using an offset spatula to help smooth the top.

Also, these technically aren’t truffles, they’re filled chocolates. Truffles are made with ganache, which could certainly be used as the filling, perhaps with a raspberry tucked into the center of each one. However, I think the very best thing to make with these would be chocolate covered cherries.

The “blood” appears to just be powdered sugar and food coloring; a tastier version might be made with raspberry or cherry syrup, either purchased (raspberry | cherry) or homemade (raspberry | cherry).

I do love the suggestions for presentation, with each candy individually nestled in red tissue. What better way to tell a loved one that you’re thinking of them than to give them a boxful of brains?

Posted in Doom It Yourself | 3 Comments »

Pearlies

June 30th, 2011 by Cobwebs

PearlyI ran across Pearlies in Mary Poppins when I was a kid, and sort of assumed they had died out around the same time as dancing chimney sweeps. I was thus somewhat surprised to find this description of modern Pearlies and learn that the tradition is alive and well.

Pearlies (you can read about their history at the links above) wear clothing decorated with pearl buttons sewn in elaborate patterns. If you’ve got a stash of castoff buttons, this would be a great use for them.

Although a full suit or dress covered with buttons would certainly be an impressive–not to mention heavy–sight, smaller projects such as a hat, tote bag, or throw pillow decorated with a traditional pattern might be rather less daunting. A Pearly outfit or accessory would be an interesting choice for a Steampunk costume as well.

You can find historic patterns at sites devoted to the tradition* (search “pearly kings and queens” or “pearlies of London”), but could also adapt simple cross-stitch designs such as skulls or spiders for something a bit darker.

If you’re like me, you probably already have a box of random buttons lurking somewhere. If not, look for them in thrift stores or ask crafty friends to share their stash. As a last resort, plain plastic buttons can be purchased fairly cheaply at fabric or craft stores. (If you plan to use a whole lot of them, look into buying them wholesale instead; many manufacturers have a minimum wholesale order of only $50 or so.)

Since there’s a lot of hand-sewing involved (I suppose you could try hot glue for lightly-used items like neckties, but would make no promises about durability) this is a good project if you like to keep your hands busy whilst watching TV. You could start small, perhaps something as simple as a button brooch, and then expand into larger and more elaborate projects as you gain experience. The results are certainly attractive and unique.


*Since Pearlies in the UK are associated with charitable organizations, I have no idea whether wearing an “unauthorized” costume there will get you glared at or not. Um, beware, I guess.

Posted in Doom It Yourself | 1 Comment »

Spidery Shirt Makeover

June 14th, 2011 by Cobwebs

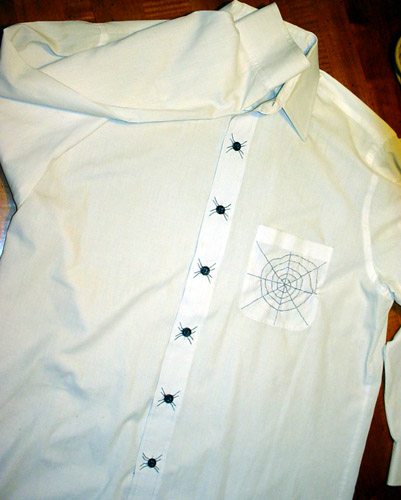
Spider ShirtHere’s a super-simple way to give a plain dress shirt a whimsically gothic facelift. If you can sew on a button and do a plain backstitch, you can whip this up in a couple of hours. (Click thumbnail for bigger.)

You will need:

  • Buttoned dress shirt, white or some other light color
  • Black buttons the same size as the shirt’s buttons
  • Black embroidery floss
  • Grey or silver embroidery floss
  • Thread
  1. Remove the buttons from the dress shirt and sew the black buttons in their place.
  2. Use the black floss to embroider spider legs around each buttonhole (it helps to button the shirt to figure out where to place the legs).
  3. Use the grey floss to embroider a spiderweb on the pocket (or, if the shirt doesn’t have a pocket, on a corner of the collar): Stitch intersecting straight lines and then stitch a widening spiral. Here are some easy instructions if you aren’t sure what you’re doing.
  4. If desired, stitch an extra button to the web and embroider legs on it as well.
  5. Done! Couldn’t be easier.

Posted in Doom It Yourself | 3 Comments »

Butterbeer Base

May 31st, 2011 by Cobwebs

Butterbeer LabelFans have been devising recipes for butterbeer since the day after Harry Potter first hit the shelves, and now that the theme park in Florida serves “real” butterbeer, they’re more prevalent than ever. I’ve seen recipes for both hot and cold versions of the drink, and it occurred to me that a base which would work for either might be worth concocting.

I ran across this recipe which suggests that “vanilla butter and nut extract” is essential to an authentic taste. Most of the brands I found were artificially flavored, which I don’t particularly care for. If you’re in the same boat, this brand says it’s “derived from natural sources,” or you can do what I did and make your own: Cover 2/3 cup pecans and 1/3 cup walnuts (or 1 cup butternuts if you’re fortunate enough to have a local source; they’re not commercially available) with boiling water for about 90 seconds to remove their tannins. Drain, put in a glass jar with a tight-fitting lid, and cover with vodka. Let sit in a cool, dark place for about three weeks, shaking occasionally. Strain through a coffee filter to remove particles and store in a jar or bottle with a tight lid.

For the base, you will need:

1 C firmly packed light brown sugar
1/4 C light corn syrup
1/4 C (1/2 stick) unsalted butter
Pinch of salt
1/2 C heavy cream
1/2 tsp vanilla extract
2 tsp butternut extract (that stuff we just made up above)
2 Tbsp butterscotch schnapps*

In a small heavy saucepan combine brown sugar, corn syrup, butter, and salt. Bring to boil over medium heat, stirring and washing down any sugar crystals clinging to the side with a brush dipped in cold water, until the sugar is dissolved. Reduce heat and simmer without stirring for 1 minute. Remove from heat and stir in cream (the mixture will bubble dramatically), extracts, and schnapps. Cool, then refrigerate for up to 2 months. Makes about 1-1/2 C.

A condiment squeeze bottle is handy for storage, since you can squeeze the desired amount right into your beverage.

For cold butterbeer, squeeze 2-3 Tbsp of the base into the bottom of a glass, pour in a small amount of cream soda, stir a bit to dissolve the base, then top up with more cream soda.

For hot butterbeer, bring 1 C whole milk (or a mixture of milk and half-and-half if you’re feeling particularly decadent) to a simmer, whisk in 4 Tbsp of butterbeer base, and pour into a mug.

Either version can be topped with whipped cream (flavor it with a bit of butternut extract for extra punch), and spiked with additional butterscotch schnapps. It might also be interesting–although I haven’t tried it, so take that into consideration–to use the syrup to flavor stout (oatmeal or chocolate).

A squeeze bottle of base paired with a couple of etched mugs might be a nice gift for the HP fan in your life.


*If you’re really, really hardcore about natural ingredients, you can make the schnapps from scratch too: Make butterscotch candy, then use it to infuse vodka to taste.

Posted in Doom It Yourself | 1 Comment »

Skully Shibori Scarf

May 25th, 2011 by Cobwebs

Skull ScarfShibori is a traditional Japanese technique somewhat similar to tie-dyeing: You clamp, twist, sew, or otherwise bind fabric and then dye it, resulting in interesting patterns. If you choose fabric that tends to shrink (such as wool), the same binding techniques can be used to “mold” three-dimensional surfaces.

Scarves are an easy (and, given the price of wool, reasonably inexpensive) way to show off this technique. Here’s how to use shibori to make a scarf with a subtle skull design.

Posted in Doom It Yourself | 3 Comments »

DIY Voodoo Kit

May 11th, 2011 by Cobwebs

Voodoo SachetA while back Bonni Reid mentioned this peculiar vintage ad for “voodoo kits” which contained, quote, “Haitian doll, hand-carved mahogany needles to stick in doll, chicken feathers, voodoo dirt, list of awful voodoo curses.” After being rendered momentarily speechless by the ad copy, it occurred to me that a DIY kit would be sort of fun to put together.

Although popular culture nearly always depicts voodoo dolls as being used for evil purposes, actual practitioners generally use them for positive goals such as healing illness or sparking romance. A kit with a doll (or components to make one), pins, and other accessories would be a novel gift to celebrate someone’s new job or other life-changing event. (Depending upon the amount of stock you put in the efficacy of “magic,” you may wish to include a note indicating the belief that using the doll for malign ends will result in karmic backlash.)

Starting with the doll, you can either sew a simple cloth rag-doll or make a more “traditional” one from sticks and Spanish moss.

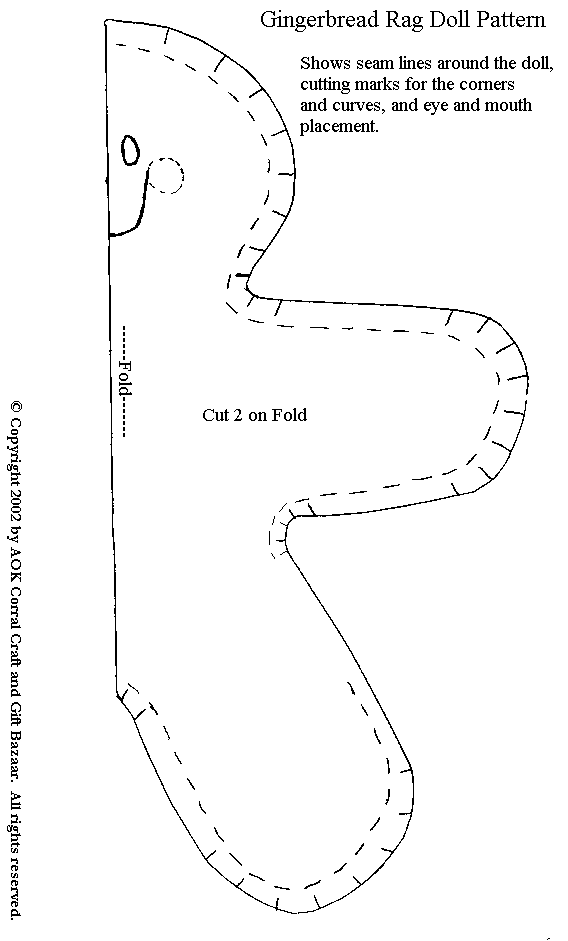
For the former, either hand-draw a basic human shape for use as a pattern, or look around for simple cloth doll patterns such as this or this. Fabric can be anything from basic muslin to silk brocade, depending on how primitive you want the doll to look and/or the tastes of the person you’re making it for. Add facial features, a heart, and optional “targets” with embroidery or fabric paint, then sew, turn (optional), and stuff. For the one in the photo up there, I wanted a very rustic look so I used a rough natural cotton and ran the seam along the outside so that the edges would eventually fray.

Read the rest of this entry »

Posted in Doom It Yourself | Comments Off on DIY Voodoo Kit

Rabbit Stew

April 24th, 2011 by Cobwebs

1 3-lb rabbit, cut with a cleaver through bones into 2-inch pieces
1 tsp salt
1/2 tsp freshly-ground black pepper

1/2 cup all-purpose flour
1/2 tsp cayenne

1/4 cup olive oil, divided
1 large onion, chopped
1 cup celery, chopped
2 garlic cloves, finely chopped
1 bay leaf
1 3/4 cups chicken broth
1 28-ounce can whole tomatoes in juice, drained, reserving juice, and chopped
1 10-ounce package frozen corn
1 10-ounce package frozen lima beans

Pat rabbit dry and sprinkle evenly with salt and black pepper.

Whisk together flour and cayenne in a shallow bowl. Dredge dredge rabbit in flour mixture, shaking off excess.

Heat 2 Tbsp oil in a wide 6- to 7-quart heavy (preferably cast-iron) pot over medium heat until it shimmers but doesn’t smoke. Brown half of rabbit, turning once, about 10 minutes total. Transfer to a plate. Add 1 Tbsp oil to pot and brown remaining rabbit; transfer to plate.

Add remaining Tbsp oil to pot along with onion, celery, garlic, and a large pinch of salt (about 1/4 tsp) and cook, stirring and scraping up brown bits, until vegetables are softened, about 8 minutes.

Add bay leaf, broth, tomatoes with juice, and rabbit with any meat juices from plate and bring to a simmer. Simmer, covered, 50 minutes.

Stir in corn and lima beans, then simmer, uncovered, until stew is slightly thickened and vegetables are tender, 15 to 20 minutes. Season with salt and pepper. Discard bay leaf.

Serves 4.

Posted in Doom It Yourself | 1 Comment »

Cross-Stitched Pumpkins

April 11th, 2011 by Cobwebs

Pumpkin Cross StitchYou guys all ran out after Halloween and bought fake pumpkins on clearance, right? (Right?!?) Well, here’s what to do with ’em.
The elsie marley blog has this super-simple idea for poking holes in foam pumpkins with a skewer and then cross-stitching through the holes. This is a wonderfully rustic look, and with the right colors and design they’d be lovely decor year-round.

Obviously, there are loads of different ways to riff on the basic idea. Spray-paint the pumpkins in a variety of colors, or use “special effects” paint kits to make them look like marble or wood grain. Do a search on “free halloween cross stitch patterns” to find lots of ideas for the stitching (you’ll want to make sure they’re fairly simple designs). Do complementary designs on opposite sides, or stitch a different letter on several pumpkins to spell out a short message.

This idea is easy enough that even kids should be able to give it a try (although smaller fry might need help poking the holes), and fixing any mistakes is as easy as pulling out the yarn.

If you weren’t so lucky as to score any clearance-sale pumpkins last Halloween, mark your calendar now to pick up a couple this year.

Posted in Doom It Yourself | Comments Off on Cross-Stitched Pumpkins

« Previous Entries Next Entries »