May 20th, 2010 by Cobwebs
 Nancy Minsky, the author of Denim Revolution, did a tutorial for making a Venetian carnival mask out of a scrap of denim.
I’m not entirely sold on using denim as the base material (nor of using the suggested faux-fur mask lining; I think the fur would get in your eyes), but the general method is a great jumping-off point for creating a mask of your own design. The pattern is easy, and the tutorial gives some good tips for planning the arrangement of decorations. I also like the ribbon-encased back band, which looks much nicer than naked elastic.
Two or three of these done in different styles would be a pretty wall decoration. If you aren’t planning to wear them, you could also use stiff cardboard instead of fabric and simply glue the embellishments in place.
Posted in Doom It Yourself | 1 Comment »
May 12th, 2010 by Cobwebs
 The PSDtuts site has a great tutorial for making a turn-of-the-(last)-century Vaudeville poster with faux hand-tinting. It’s slightly advanced for a Photoshop novice, but if you’re reasonably familiar with the tool this isn’t too difficult. I love the vintage look of the finished work.
This would be a great decoration for a party or prop for an RPG, and would also make wonderful party invitations. (Somewhere deep in the recesses of my admittedly-addled brain I’ve got the notion that Carrie Mae did her wedding invitations like a vaudeville poster, but I may be hallucinating that. It’s a neat idea, either way.)
The site makes the complete layered Photoshop files for its tutorials available for download with membership ($9 for one month, reduced amounts for multiple months). If you’re planning to tackle this project it might be worth a short-term membership to have a completed version available for reference.
Posted in Doom It Yourself, Terror in the Aisle | Comments Off on Photoshop Tutorial: Vaudeville Poster
May 6th, 2010 by Cobwebs
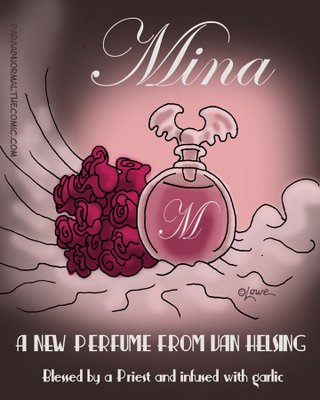
 I’ve had this cartoon from Para Abnormal kicking around in my Drafts folder for ages now, mainly because I like the idea of a “Mina” perfume by Van Helsing (click the image to enlarge).
I’ve never been sure what to do with it, so I guess I’ll use it as a hook for talking about making your own perfume. Which I suppose you could make garlic-scented if you really wanted to.
You will need:
- About 2 cups of fresh or 1 cup of dried flower petals. Choose flowers that are pesticide-free and nontoxic, and if you’re using fresh flowers try to collect them as close to the time they first open as possible. It’s easiest if you select flowers that have a strong scent, but you can capture a lighter fragrance by running multiple batches of petals through the same water.
- Four cups of spring or distilled water.
- 5 Tbsp of high-proof alcohol: Vodka, Everclear, or perfumer’s alcohol (available from hobby suppliers).
Instructions:
- If using fresh petals, chop them up a bit (don’t puree them). Put the fresh or dried petals in a nonreactive bowl and cover with the water. (If the water doesn’t completely cover the petals, add more until it does.) Cover and let sit overnight.
- Strain through cheesecloth, removing all solid material.
- If you’re using a delicately-scented flower, repeat steps 1 and 2 with a fresh batch of petals and the same water.
- Place the water in a nonreactive saucepan and simmer gently for a couple of hours, until reduced to about 2 Tbsp of liquid. Be careful not to boil, as it will drive off the fragrance.
- Cool and place in a small glass bottle (dark glass is best). Add the alcohol, cap, and shake.
- Let sit for 3-4 days before testing.
- If the fragrance is too strong, you can dilute it with a little more distilled water: Add 1 Tbsp at a time, letting it rest for 24 hours before testing again and adding more water if necessary.
- Store in a cool, dark place, since light and heat will both damage the scent. The perfume will last for 1-2 months.
If you don’t feel like messing with flowers, there are lots of recipes for using essential oils instead. Snowdrift Farm and From Nature with Love both have recipes and advice for making fragrances, and you can also purchase the oils and perfumer’s alcohol from them.
Put the results in a pretty bottle, add a label, and you’ve got your own signature scent.
Posted in Doom It Yourself | Comments Off on Making Perfume
May 3rd, 2010 by Cobwebs
 Here’s a neat display idea: A bit of the outdoors under glass. These are sometimes sold pre-made as “beach boxes,” containing beach sand, shells, bits of driftwood, and other small natural objects (the pictured example is a “Great Lakes prism” by The Wild Unknown). I really like the Zen-like arrangement of the items.
Obviously, making your own box from articles you’ve collected would be more meaningful, and it certainly doesn’t have to be beach-themed. Beveled-glass pyramid boxes are available in some craft stores (although, weirdly, I couldn’t locate an inexpensive source online), but you can also choose any other small glass display that suits you.
For contents, you can collect small items from a favorite vacation spot* or–my favorite–visit an old cemetery and look for interesting objects. A bit of graveyard dirt (dry it in the oven if you’re going to put it in a sealed container, lest residual moisture fog up the glass), a crow’s feather, and other doom-laden detritus would make a gloomily lovely display.
One of my prized possessions is an antique key that I found in an old graveyard in England. I usually wear it on a necklace, but I’m thinking about making it the centerpiece of a desktop display like this one.
*Please make sure that there are no restrictions on collecting before you take anything. Many national parks and similar sites have strict regulations about that sort of thing to protect fragile ecosystems.
Posted in Doom It Yourself, Paint It Black | 1 Comment »
April 28th, 2010 by Cobwebs
 Dave Lowe recently did a series of “Sinister Saint” cartoons on Para Abnormal, highlighting saints who are the patrons of things like gravediggers and swordsmiths. He decided to turn a couple of them into novena candles for Halloween props, and posted a how-to on his blog.
He’s got the “candle-ready” images he used available for download, but the same method could be used for the image of your choice. Adding stained-glass effects to a picture is fairly easy in Photoshop (this is one method, but there are lots of other tutorials available for the googling), and if you have access to a color printer it’d be easy to turn out lots of these pretty quickly.
These might make interesting favors for parties or weddings: Browse through the Big List o’Saints* to find appropriate patrons,*** fancy up their icons in Photoshop (bonus: Old-time saints tended to get sainted by dint of being gruesomely martyred, so the artwork depicting them frequently looks like something Clive Barker dreamed up), print, glue, and done!
I’m a big fan of projects that look like they took much more time and skill than they actually did, and this is something that even the most thumb-fingered amongst us should be able to accomplish pretty easily.
*Not its real title.**
**Although, frankly, given that there’s patron saint of knife-grinders and a saint you’re supposed to pray to for in-law problems, it’s hard to think of it by anything grander.
***Incidentally, the patron saint of the Internet is St. Isidore. Despite having lived around 600 AD, when broadband really wasn’t widely available, he was nominated as the patron of computers, computer techs, and the Internet in 1999.
Posted in Doom It Yourself, Paint It Black | Comments Off on “Sinister Saint” Novena Candles
April 26th, 2010 by Cobwebs
 Here’s a box that will make a statement, no matter what gift is inside. Noah Fentz made this for a haunter’s group gift exchange. It’s papier mache and paint with a faux barbed-wire “ribbon,” and makes a nice companion to the gift box he did the previous year which appeared to be sewn from Santa’s skin. You can see photos of both here.
He doesn’t provide details on what the faces are made from, but I’m assuming they’re lightweight plastic or carved styrofoam (they might be wig heads similar to the ones he used on his pillars of lost souls). He mentioned that his papier mache technique was inspired by Pumpkinrot and Spooky Blue, but Stolloween is also a wonderful resource site.
This is a relatively simple but undeniably effective idea, and ripe for all kinds of customization. You could cover a box with pretty much any lightweight object that would hold up to hot glue and papier mache: Spiders, skulls, cryptic runes, writhing tentacles; anything you can purchase, carve from styrofoam, or model in clay. Glue to a sturdy box (one with a separate lid is probably best), cover with papier mache, and paint as desired. With a box this cool, the gift is probably optional.
Posted in Doom It Yourself, Paint It Black | 1 Comment »
April 14th, 2010 by Cobwebs
 Fashion Infusion has a great tutorial for gussying up a pair of plain shoes with chains and studs. I love this kind of DIY embellishment: It’s fairly simple, but the result is really stunning and looks like it took far more effort than it really did.
Check out some of the blog’s other DIY ideas too: I’m especially fond of these fingernail gloves and these decorated tights. There aren’t any instructions for those two, but they’re wonderful inspiration nonetheless.
(via Haute Macabre)
Posted in Doom It Yourself | 2 Comments »
April 12th, 2010 by Cobwebs
 I love the elegant look of wax seals, but it’s sometimes difficult (or expensive) to find the perfect design. The RageHaus blog has a great tutorial on making a custom seal using a wooden dowel.
The pattern is incised with a wood-burning tool, so unless you have a very steady hand you might not be able to get the same kind of fiddly little detail that you would with a cast metal stamp. If you don’t have a wood-burning tool, I expect that it might also be possible to carve the design with an X-Acto knife or a small Dremel tool.
The technique should be fine for things like monogram initials in the font of your choice or patterns with a fairly simple outline (say, bats rather than intricate spiderwebs). Making your own is certainly cheaper than having a custom stamp designed for you, and the dowel should hold up much longer than stamps made of linoleum or other soft materials.
The DIY method gives you great flexibility in matching a seal to its intended purpose: The invitations for each party you throw could have different themed seals, and RPG props, Halloween decorations, or special documents could all benefit from a seal with an appropriate design.
(via MAKE)
Posted in Doom It Yourself | 2 Comments »
April 8th, 2010 by Cobwebs
 These are kind of brilliant. I ran across them on Orange and Black, and a bit of sleuthing revealed that they were part of an ad campaign in Romania. Guinness is a niche brand there, and the coasters were created as a low-cost idea to drive sales on Halloween.
These would be a fun and not-too-terribly-difficult project if you’re handy with an X-Acto knife. The coasters could be cut out of acetate or other thin plastic, or possibly fron thin sheets of cork; if they won’t be used heavily they might also be cut from sturdy felt.
A set of these coasters would be an interesting hostess gift, particularly if paired with a six-pack of Guinness or a dark alcohol like Blavod. For a simple idea, they have an enormous amount of style.
Posted in Doom It Yourself | 2 Comments »
April 1st, 2010 by Cobwebs
 Zakka Life posted these instructions for making super-easy throw pillows decorated with doll clothes: It’s really nothing more than tacking the clothes to the pillow with a running stitch.
Given the variety of doll clothes available, it would be easy to make some wonderfully gothy pillows using the same technique. Make or purchase throw pillows in dark brocades or other luxurious fabrics and look for doll-sized ball gowns, Halloween costumes, or naughty underwear to stitch to the front. It could hardly be easier.
A set of pillows like this would also make an unusual gift, particularly if they followed a theme (nurse, witch, etc.) that was meaningful to the recipient.
Posted in Bad Things, Doom It Yourself | Comments Off on Doll Clothing Throw Pillows